


How to Build Your Own Butterfly House
For this Project, You Will Need:
A butterfly house can help to spruce up your garden by adding a landscaping element. During the fall, butterflies start preparing to go dormant for the winter. However, these can make a great birthday or Christmas gift as well, so we wanted to share it with you. There are many great variations on butterfly house plans, but the great thing about them is that all of the variations are easy to build and can make a great craft project for a free afternoon. Who knows… You could make hundreds in your garage over the winter and be running your own butterfly house business before long! This particular butterfly house can be made with scraps lying around your house as it has a natural appearance when it’s finished.
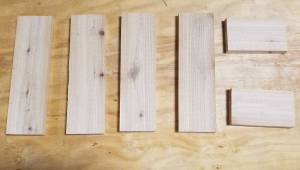
Step 1 – Cutting the Frame
The first thing you want to do is measure your lumber. Use your tape measure and pencil to measure and mark off the following sizes:
• Back: 5-1/2″ wide by 18″ tall
• Front: 5-1/2″ wide by 18″ tall
• Sides 5-1/2″ wide by 18″ tall
• Top: 5-1/2″ wide by 7-1/2″ long
• Bottom: 5-1/2″ wide by 7-1/2″ long
Once you have your pieces measured, it’s a good idea to make a notation in the center of each one so you know which piece is the top, bottom, or side.

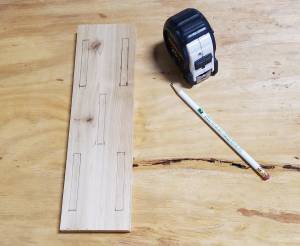
Step 2 – Adding Butterfly Entrances
Making the frame is just the beginning of this project. Now, you need to create the openings that the butterflies will enter. Use your tape measure and pencil to measure out (5) 3″ tall by 3/8″ wide slits, (2) on each side and (1) in the middle. Once you’re finished marking, drill a 1/4″ hole through the slits so you can fit a jigsaw blade then cut them out using the jigsaw or a router!

Step 3 – Making a Butterfly House a Home
Secure the side and front boards to the bottom board. Set the back board in place and secure with one nail through each side at the top to act as a hinge so you can open and close the back board. Hammer one nail half way through the bottom of the back board, but not to far so that it’s sticks through the other side and you can use that as a handle to open and close. Lastly secure the top board.
Step 4 – Finishing Touches
Your butterfly house is nearly completed! Just a few more finishing touches to the inside of the butterfly house. Put a thin layer of moss at the bottom of the house, taking care to leave your slits and some of the bark uncovered. Add one or two branches with leaves to finish your decorating.
Step 5 – Hanging
Hanging your butterfly house is easy. The best place to put it is near a butterfly bush or another area they frequent. You can hang the butterfly house from a tree limb, but the best course of action is to affix it to a pole or tall, wooden stake close to the butterfly bush. We know you have at least one family member that would love to receive one of these as a gift!
Happy building, from Odd Job Larry!